|
|
Measure |
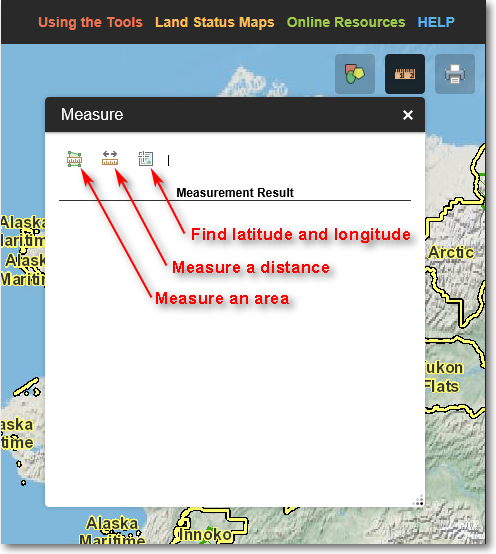
The Measure tool allows you to measure distances and areas on the map. You might use this if, for example, you want to determine the acreage of a lake, or to find out how far it is from one location to another.
The Measure Tool
1) Click the Measure icon in the upper-left corner of the Mapper. The following will be displayed:

The Drawing Tools menu. Click any of the drawing tool icons to draw map annotations
To Measure an Area
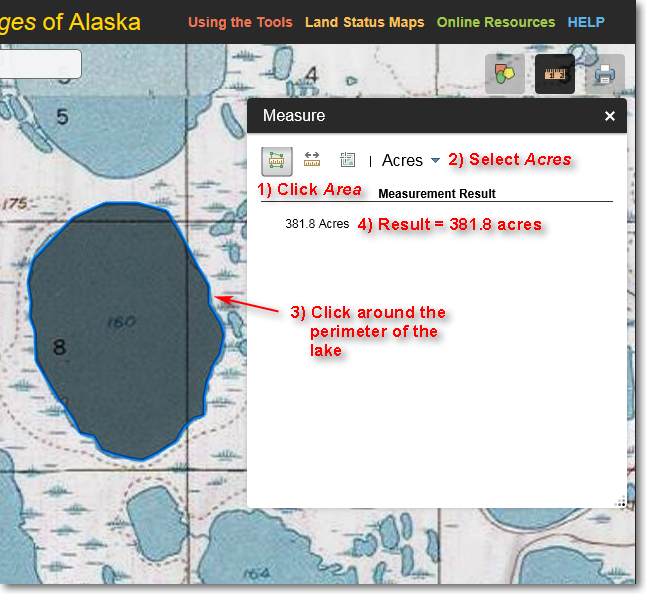
Assume you need to determine the size of a lake for a project you're working on. You can do this using the Measure > Area tool, as detailed below.

Illustration of using the Measure > Area tool to determine the area of a lake
1) Click the Area icon.
2) Select your desired area units. In this example, acres is selected.
3) Click the left mouse button all around the outline of the lake. To finish, double-click.
4) In this example, the shoreline of the lake is highlighted with a blue line and the area is displayed. The lake is 381.8 acres in size.
To Measure a Distance
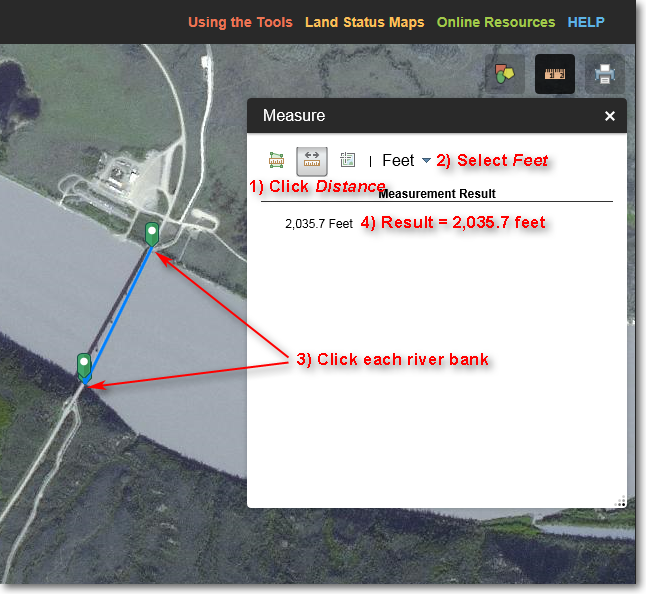
Assume you need to determine the width of a river. You can do this using the Measure > Distance tool, as detailed below.

Illustration of using the Measure > Distance tool to determine the width of a river
1) Click the Distance icon.
2) Select your desired distance units. In this example, feet is selected.
3) Click the left mouse button on both sides of the river. To finish, double-click.
4) In this example, a blue line with green endpoint icons is displayed. The river is 2,036.7 feet wide.
Note:
You can also measure a meandering path. To do so, click the left mouse button along the length of whatever you want to measure, then double-click to end the line. The total distance will then be displayed.
To Find the Latitude and Longitude of a Location (Datum = WGS84)
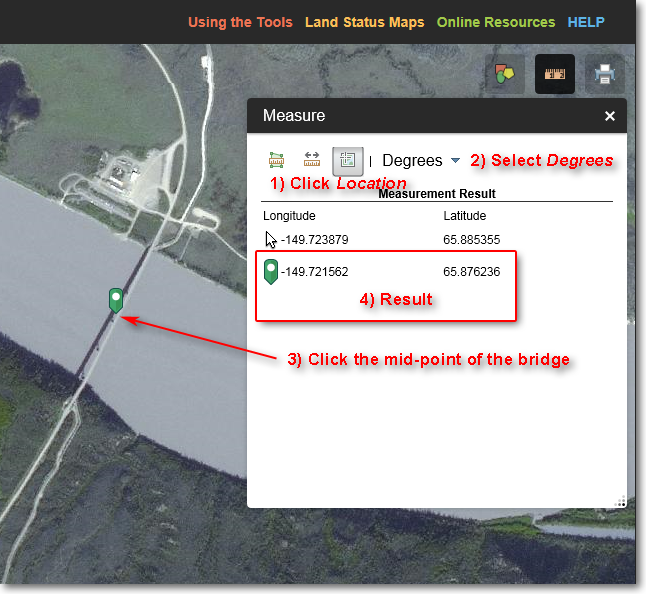
Assume you need to know the latitude and longitude of the center of a bridge. You can do this using the Measure > Location tool, as detailed below.

Illustration of using the Measure > Location tool to determine
the latitude and longitude of the center of a bridge
1) Click the Location icon.
2) Select your desired coordinate units. In this example, degrees is selected.
3) Click the left mouse button at the location where you need the latitude and longitude.
4) In this example, a green icon is displayed at the location you clicked. The latitude is 65.876236 North and the longitude is 149.721562 West.
Note:
The reported latitude and longitude is with respect to the WGS84 datum. When reporting the coordinates, you must always include the datum (see below for additional details concerning coordinates and datums).
|
|
A point on the Earth can noted as an XY coordinate. X and Y refer to locations within a Cartesian coordinate system, where X identifies a position along the horizontal (X) axis and Y identifies a position along the vertical (Y) axis. •In a geographic coordinate system, longitude is expressed by the X value, and latitude is expressed by the Y value. •In a projected coordinate system, Easting is expressed by the X value, and Northing is expressed by the Y value. ...and Know Your Signs With geographic coordinate systems, it is critically important to understand how north, south, east, and west are represented by the coordinate values. Algebraic signs, plus (+) and minus (-) are used to indicate the compass directions, as such: •North latitude is represented as a positive value (+) •South latitude is represented as a negative value (-) •East longitude is represented as a positive value (+) •West longitude is represented as a negative value (-) |
|
|
Converting between latitude and longitude formats Latitudes and longitudes can be expressed in several different formats, such as: •45° 24' 13.4" (Degrees, minutes, seconds) •45° 24.223 (Degrees and decimal minutes) •45.40372222° (Decimal degrees) All three examples above are equivalent, that is, they identify the same spot on the Earth. You may run into situations where you must provide latitude and longitude values in a particular format. For example, you might have a lat/long coordinate in degrees, minutes, and seconds format, but the program you're working with might require you to input the lat/long in decimal degrees format. To do this, you have to convert from one format to another. You can do this using an online lat/long converter. There are many such converters available online, but here's one that's very easy to use: http://rumkin.com/tools/gps/degrees.php This site converts from any of the three formats to any of the other three. |
|
|
Latitude + Longitude + Datum = A Complete Coordinate, aka LLD = Problem Free! Casual use of latitude and longitude positions generally doesn't involve referencing the datum to which the lat/long is tied. However, when dealing with GIS a higher level of precision is required, thus lat/long values must always include the associated datum. When noting lat/long coordinates or giving lat/long coordinates to someone, you must always report the datum which is used by the coordinates. Without the datum information, the user will have to guess which datum your lat/long coordinates are in, and this often leads to misalignment of features. Following are several examples of the correct way to note lat/long coordinates: •45.50, -150.25, NAD27 •45.50 N, 150.25 W, NAD83 •45° 30' 00" N, 150° 15' 00" W, WGS84 Note that for each example, the datum has been specified. A lat/long coordinate should never leave your desk without a datum specified. Remember: LLD = Problem Free! |
The Region 7 Land Mapper was developed, and is maintained by, the U.S. Fish & Wildlife Service, Region 7, Division of Realty. Questions, comments,and suggestions should be directed to ak_realty@fws.gov
This page was last updated: Monday, August 12, 2024